Picasso 加载流程
自己第一次写比较完整 app 还是去年暑假,当时参加现在的团队夏令营,组长要求我们不能使用第三方库(亏得自己还苦哈哈地看了几天各种第三方库),所以就得自己手写图片加载逻辑,所以也就遇到很多问题,比如错位、加载慢等。不过使用第三方库的话,一行代码就能解决这些问题。
不废话了,从我的角度来看,网上目前流行的图片加载库也就三款,Picasso、Glide 和 Fresco,而它们的功能也是依次递增。Glide 是 Google 员工基于 Picasso 进行的二次开发,Google 在自己的应用里面也大量使用;Fresco 则出自 Facebook 之手,由于使用 Native/C 来缓存图片,所以一定程度上减少了 OOM 的可能。
现在大概清楚了三款库的定位,前两者专业性显然不如 Fresco,但是使用上简单,如果是应用内有大量的图片加载场景,如图库类应用,使用 Fresco 应该是个不错的选择。所以这次我们就选最简单的 Picasso 来分析,认怂。。。
图片加载库最经典的场景就是 从网络加载一张图片到 ImageView , Picasso 对此给出了最简单的解决方案:
Picasso.with(context)
    .load("http://i.imgur.com/DvpvklR.png")
    .into(imageView);
那么我们的分析也就针对这几行代码。
平台
- OS:Ubuntu 17.04
- IDE:Android Studio
- Picasso:3.0.0-SNAPSHOT
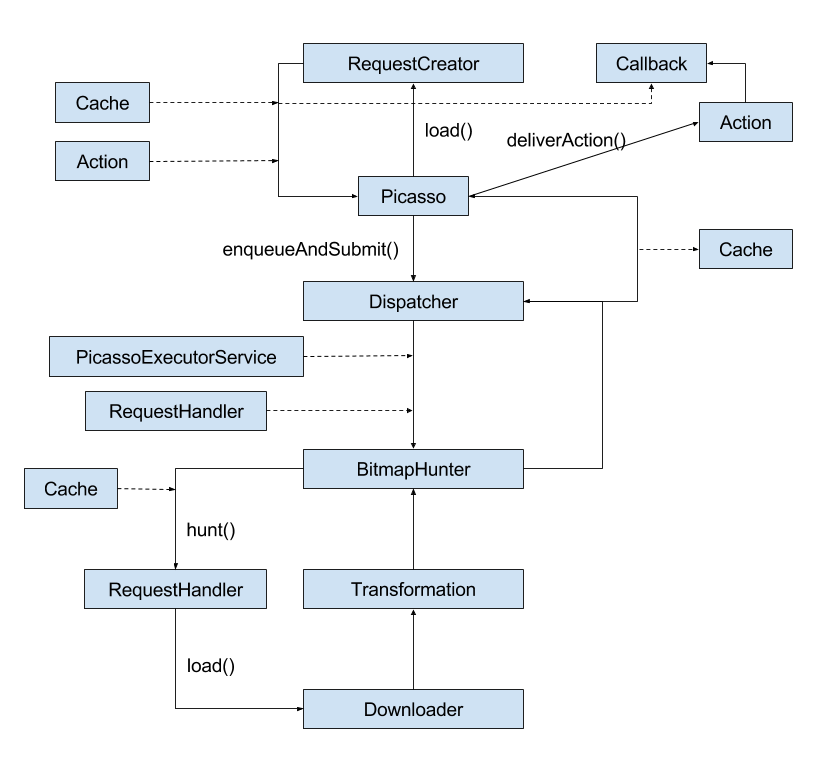
整体流程
还是先看看一个简单的流程图:
关键类剖析
真正开始分析源码之前先简单地解下一些重要的类,以及相关的接口。
Picasso
图片加载的入口,主要是完成诸如 Downloader 、ExecutorService 、 Cache 、 RequestHandler 、Bitmap.Config 等的配置,如果没有使用自定义的配置,Picasso内部都有默认配置。
RequestCreator
这个类主要职责是构造一次图片加载的配置,比如 url、大小、动画等等,最后提交请求。
public class RequestCreator{
  private final Picasso picasso;
  private final Request.Builder data;

  private boolean noFade;
  private boolean deferred;
  private boolean setPlaceholder = true;
  private int placeholderResId;
  private int errorResId;
  private int memoryPolicy;
  private int networkPolicy;
  private Drawable placeholderDrawable;
  private Drawable errorDrawable;
  private Object tag;

  boolean willReplay;
  boolean cancelled;
  ...
}
Action
针对图片加载的目标对象,Action 对此进行了一个抽象,具体的由实现类实现,比如简单加载图片到 ImageView 中,那么就是 ImageViewAction,同理,NotificationAction 就是加载图片到 Notification 中。我们本次要分析的是 ImageViewAction
Dispatcher
加载任务的调度器,负责加载任务的开始、暂停、恢复以及失败之后的回调处理。
BitmapHunter
Runnable 子类,具体图片加载的抽象,内部调用 Cache 、Downloader 提供的接口来完成 bitmap 的获取,也完成一些图片的转换操作。
RequestHandler
针对图片不同来源,比如从网络、磁盘、assets、resources 等获取,会有不同的 RequestHandler 子类处理。 Picasso 内部有个 RequestHandler 的集合,到遇到一个加载任务时,遍历这个集合并调用 RequestHandler#canHandleRequest(Request data) 方法来判断是否可以处理这个请求,当找到可以处理的就立即中断循环,没有则会得到一个 ERRORING_HANDLER 。而判断是否可以处理请求的依据就是我们传入的图片 uri ,源码中都很清晰。
这里我们的分析 NetworkRequestHandler 。
Downloader
下载网络图片的下载器接口,Picasso 默认实现是 OkHttp3Downloader。因为我们主要是分析图片加载流程,所以这一部分大概知道就行了。
Transformation
图片转换接口,在配置加载的时候传入自定义的 Transformation 实现可以实现诸如 圆形、高斯模糊 等。
Cache
内存缓存接口,默认实现是 LruCache。Picasso 没有自己实现磁盘缓存,而是直接使用 OkHttp3 的磁盘缓存。
Callback
图片加载完成之后的回调。
流程剖析
关于 Picasso 初始化配置也有太多必要去看,直接从 picasso#load() 方法开始。
创建请求并提交
public RequestCreator load(@Nullable Uri uri) {
    return new RequestCreator(this, uri, 0);
}
所有的 picasso#load() 最终都会创建一个 RequestCreator 实例。然后调用 RequestCreator#into() 方法提交一个加载请求。
public void into(ImageView target, Callback callback) {
  long started = System.nanoTime();
  checkMain();

  Request request = createRequest(started);
  String requestKey = createKey(request);

  if (shouldReadFromMemoryCache(memoryPolicy)) {
    Bitmap bitmap = picasso.quickMemoryCacheCheck(requestKey);
    if (bitmap != null) {
      picasso.cancelRequest(target);
      setBitmap(target, picasso.context, bitmap, MEMORY, noFade, picasso.indicatorsEnabled);
      if (callback != null) {
        callback.onSuccess();
      }
      return;
    }
  }

  Action action =
      new ImageViewAction(picasso, target, request, memoryPolicy, networkPolicy, errorResId,
          errorDrawable, requestKey, tag, callback, noFade);

  picasso.enqueueAndSubmit(action);
}
上面代码有删改,只保留了和本次分析有关的关键代码。
首先是创建一个请求,但是并没有立即提交。然后查询 内存缓存 ,如果内存有可用的缓存,设置 Bitmap 并回调;这里的 key 是根据 Request 来创建的,不同的请求配置,key 也会不一样。当缓存不可用时,就把 Request 封装成 Action ,然后交由 Picasso 来进行提交。
提交过程
void enqueueAndSubmit(Action action) {
    Object target = action.getTarget();
    if (target != null && targetToAction.get(target) != action) {
        cancelExistingRequest(target);
        targetToAction.put(target, action);
    }
    submit(action);
}

void submit(Action action) {
    dispatcher.dispatchSubmit(action);
}
提交时需要取消当前 ImageView 可能存的加载请求,同时放入 targetToAction 这个 Map 容器里,最后由 Dispatcher 进行调度。
Dispatcher 中转
void dispatchSubmit(Action action) {
  handler.sendMessage(handler.obtainMessage(REQUEST_SUBMIT, action));
}

void performSubmit(Action action, boolean dismissFailed) {
  if (pausedTags.contains(action.getTag())) {
    pausedActions.put(action.getTarget(), action);
    return;
  }

  BitmapHunter hunter = hunterMap.get(action.getKey());
  if (hunter != null) {
    hunter.attach(action);
    return;
  }

  hunter = forRequest(action.getPicasso(), this, cache, stats, action);
  hunter.future = service.submit(hunter);
  hunterMap.put(action.getKey(), hunter);
  if (dismissFailed) {
    failedActions.remove(action.getTarget());
  }

}
Dispatcher 内部有一个用于消息转发的 Handler ,与此出现的是多对 dispatchXXX() 和 performXXX() 函数,利用 handler 的消息队列的特性,可以提高单个任务的处理速度。
至于这一对函数的工作就是拿到/创建一个 BitmapHunter ,然后交由线程池执行加载任务。如果之前有相同的加载任务被暂停,那这次的加载任务也不会被执行,除非是执行 Picasso.resumeXXX() 操作。
BitmapHunter 的创建是由 BitmapHunter#forRequest() 来完成的:
static BitmapHunter forRequest(Picasso picasso, Dispatcher dispatcher, Cache cache, Stats stats,
                               Action action) {
    Request request = action.getRequest();
    List<RequestHandler> requestHandlers = picasso.getRequestHandlers();

    for (int i = 0, count = requestHandlers.size(); i < count; i++) {
        RequestHandler requestHandler = requestHandlers.get(i);
        if (requestHandler.canHandleRequest(request)) {
            return new BitmapHunter(picasso, dispatcher, cache, stats, action, requestHandler);
        }
    }

    return new BitmapHunter(picasso, dispatcher, cache, stats, action, ERRORING_HANDLER);
}
在这里会遍历内置的 RequestHandler,然后确定 BitmapHunter 的需要的 RequestHandler。
BitmapHunter 加载工作
@Override
public void run() {
    try {
        updateThreadName(data);
        result = hunt();
        if (result == null) {
            dispatcher.dispatchFailed(this);
        } else {
            dispatcher.dispatchComplete(this);
        }
    } catch (Exception e) {
        exception = e;
        dispatcher.dispatchFailed(this);
    }
}

Bitmap hunt() throws IOException {
    Bitmap bitmap = null;

    if (shouldReadFromMemoryCache(memoryPolicy)) {
        bitmap = cache.get(key);
        if (bitmap != null) {
            loadedFrom = MEMORY;
            return bitmap;
        }
    }

    networkPolicy = retryCount == 0 ? NetworkPolicy.OFFLINE.index : networkPolicy;
    RequestHandler.Result result = requestHandler.load(data, networkPolicy);
    if (result != null) {
        loadedFrom = result.getLoadedFrom();
        exifOrientation = result.getExifOrientation();
        bitmap = result.getBitmap();

        // If there was no Bitmap then we need to decode it from the stream.
        if (bitmap == null) {
            Source source = result.getSource();
            bitmap = decodeStream(source, data);
            source.close();
        }
    }

    if (bitmap != null) {
        if (data.needsTransformation() || exifOrientation != 0) {
            synchronized (DECODE_LOCK) {
                if (data.needsMatrixTransform() || exifOrientation != 0) {
                    bitmap = transformResult(data, bitmap, exifOrientation);
                }
                if (data.hasCustomTransformations()) {
                    bitmap = applyCustomTransformations(data.transformations, bitmap);
                }
            }
        }
    }

    return bitmap;
}
加载逻辑在 hunt() 里面,这里会先再查询一次内存缓存,没找到就会去从网络下载(不同的Uri可能不同),从网络下载完之后可能需要对图片的方向进行一些调整,然后如果又配置 Transformation 的话,也会进行一些转换。bitmap 的后续操作都用 DECODE_LOCK 锁住,同一时间只有一张 bitmap 被处理,这样保证了不会对内存和 CPU 造成太大的压力。
获取之后
在获取到 bitmap 之后,又需要借助 Dispatcher 来完成后续的中转操作。
void dispatchComplete(BitmapHunter hunter) {
  handler.sendMessage(handler.obtainMessage(HUNTER_COMPLETE, hunter));
}

void performComplete(BitmapHunter hunter) {
  if (shouldWriteToMemoryCache(hunter.getMemoryPolicy())) {
    cache.set(hunter.getKey(), hunter.getResult());
  }
  hunterMap.remove(hunter.getKey());
  batch(hunter);

}

private void batch(BitmapHunter hunter) {
  if (hunter.isCancelled()) {
    return;
  }
  if (hunter.result != null) {
    hunter.result.prepareToDraw();
  }
  batch.add(hunter);
  if (!handler.hasMessages(HUNTER_DELAY_NEXT_BATCH)) {
    handler.sendEmptyMessageDelayed(HUNTER_DELAY_NEXT_BATCH, BATCH_DELAY);
  }
}

void performBatchComplete() {
  List<BitmapHunter> copy = new ArrayList<>(batch);
  batch.clear();
  mainThreadHandler.sendMessage(mainThreadHandler.obtainMessage(HUNTER_BATCH_COMPLETE, copy));
}
这些方法会依次被调用,首先将 bitmap 写入缓存,然后将 bitmapHunter 保存到 batch 这个容器里面,然后进行 批量处理 ,批量处理可以减少消息数量,提高效率。
主线程处理
void complete(BitmapHunter hunter) {
    Action single = hunter.getAction();
    List<Action> joined = hunter.getActions();

    boolean hasMultiple = joined != null && !joined.isEmpty();
    boolean shouldDeliver = single != null || hasMultiple;

    if (!shouldDeliver) {
        return;
    }

    Uri uri = hunter.getData().uri;
    Exception exception = hunter.getException();
    Bitmap result = hunter.getResult();
    LoadedFrom from = hunter.getLoadedFrom();

    if (single != null) {
        deliverAction(result, from, single, exception);
    }

    if (hasMultiple) {
        for (int i = 0, n = joined.size(); i < n; i++) {
            Action join = joined.get(i);
            deliverAction(result, from, join, exception);
        }
    }
}

private void deliverAction(Bitmap result, LoadedFrom from, Action action, Exception e) {
    if (action.isCancelled()) {
        return;
    }
    if (!action.willReplay()) {
        targetToAction.remove(action.getTarget());
    }
    if (result != null) {
        action.complete(result, from);
    } else {
        action.error(e);
    }
}
这里代码没有什么好讲,就是一些 action 后续处理,是否该取消操作、是否移出列表啥的。最重要的就是 action.complete() 这句。
最后的工作
public void complete(Bitmap result, Picasso.LoadedFrom from) {
    ImageView target = this.target.get();

    Context context = picasso.context;
    boolean indicatorsEnabled = picasso.indicatorsEnabled;
    PicassoDrawable.setBitmap(target, context, result, from, noFade, indicatorsEnabled);

    if (callback != null) {
        callback.onSuccess();
    }
}
设置 bitmap ,回调。整个流程到这里算是完成了。
大概的流程很简单,看完这再看 Glide 应该会顺利很多