【Flutter】BLoC——Flutter 中的 MVP
写过 Android 的应该都会比较熟悉 MVP 模式,在 Flutter 框架下有着相似的 BLoC(Business Logic Component) 模式,不准确地说,BLoC 就是 MVP 在 Flutter 中的变种。
StatelessWidget vs StatefulWidget
在正式开始讲 BLoC 前,先在此回顾下 Widget。
Widget 在 Flutter 整个绘制过程中,只充当配置的角色,基本不会涉及到的绘制相关的 API,所以在应用运行过程中时刻有大量的 Widget 产生并销毁。但是很多情况下,我们并不想 Widget 的某些状态/数据也一并销毁,比如输入框中已经输入的文本,这时候就有了 Widget 的两个子类——StatelessWidget 和 StatefulWidget。
所以如果我们想要保存一些状态或者实例变量的话,就需要使用 StatefulWidget。
Stream & Sink
在 【Flutter】Dart 异步编程 中已经学习了如何通过 async* 和 yield 来创建一个 Stream,这种方式我们只能对 Stream 下游进行监听,也即上游数据源已经确定了,但是在实际应用中,上游数据应该可以来自程序的不同部分。
Dart 提供了 StreamController<T> 这个模板类来帮助开发者创建 Stream 同时向里头添加数据的能力,可以简单理解为:
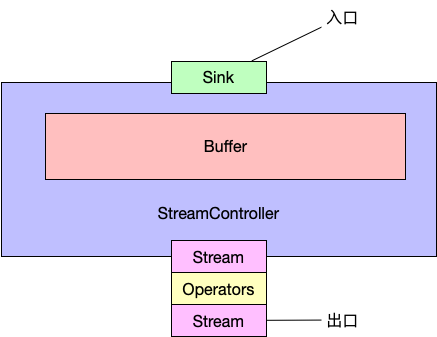
关于它的一些 API 就不多细说了,官方文档里讲得已经非常清楚。
BLoC
BLoC 的目的也是将视图和逻辑进行分离,让视图层专注于数据的展示,逻辑层管理状态并处理业务逻辑,这和 MVP 一毛一样。
这里以 Flutter 新建工程为例进行 BLoC 的讲解,先看默认实现:
class _MyHomePageState extends State<MyHomePage> {
  int _counter = 0;
  void _incrementCounter() {
    setState(() {
      _counter++;
    });
  }

  @override
  Widget build(BuildContext context) {
    return Scaffold(
      appBar: AppBar(
        title: Text(widget.title),
      ),
      body: Center(
        child: Column(
          mainAxisAlignment: MainAxisAlignment.center,
          children: <Widget>[
            Text('You have pushed the button this many times:'),
            Text('$_counter'),
          ],
        ),
      ),
      floatingActionButton: FloatingActionButton(
        onPressed: _incrementCounter,
        tooltip: 'Increment',
        child: Icon(Icons.add),
      ),
    );
  }
}
显示当前 FAB 点击次数,FAB 点击后会触发 _incrementCounter 进一步调用 setState 更新 UI,逻辑比较简单。
再看看使用 BLoC 后的代码实现:
class _HomePageState extends State<MyHomePage> {
  _HomePageBLoC _bloc;
  _HomePageState() : _bloc = new _HomePageBLoC();
  @override
  Widget build(BuildContext context) {
    return Scaffold(
      appBar: AppBar(
        title: Text(widget.title),
      ),
      body: Center(
        child: Column(
          mainAxisAlignment: MainAxisAlignment.center,
          children: <Widget>[
            Text('You have pushed the button this many times:'),
            new StreamBuilder<int>(
              initialData: 0,
              stream: _bloc.count,
              builder: (context, snapshot) {
                return Text('${snapshot.data}');
              },
            )
          ],
        ),
      ),
      floatingActionButton: FloatingActionButton(
        onPressed: _bloc.incrementCounter,
        tooltip: 'Increment',
        child: Icon(Icons.add),
      ),
    );
  }
}

class _HomePageBLoC {
  int _count = 0;
  StreamController<int> _countController = new StreamController<int>();

  Stream<int> get count => _countController.stream;
  void incrementCounter() {
    _countController.sink.add(++_count);
  }
}
这次添加了 _HomePageBLoC 作为逻辑层,实现中使用 StreamController<int> 来管理点击次数。视图层中,我们需要监听逻辑层中的数据并更新 UI,不过 Flutter 给我们提供了 StreamBuilder<T> 来简化操作。
代码已经非常简单了,就不在赘述。不过要注意这里使用了 StatefulWidget , 这是为了在 UI 重建的时候 bloc 实例不会丢失。
Scoped Model
有时候可能会有多个页面共享数据,Flutter 提供 InheritedWidget 帮助我们实现这一目的。InheritedWidget 可以将状态/数据向它的子树,当 InheritedWidget 的状态/数据发生变化,依赖了这个 InheritedWidget 的子树会进行重建。
我们对默认的 Flutter 初始工程进行改造,让两个页面都能显示点击次数,下面看下代码实现:
InhertiedWidget 实现
class CounterBLoC {
  int _count = 0;
  // 因为有多个界面对 Stream 进行监听,所以需要使用多播流
  var _countController = new StreamController<int>.broadcast();

  Stream<int> get count => _countController.stream;
  // 第二个界面监听 Stream 时,Stream 里头是没有数据的,但是实际上点击次数是有的,所以需要提供一个方法来获取最近的一次数据
  int get lastCount => _count;
  void incrementCounter() {
    _countController.sink.add(++_count);
  }
}

class CounterHolder extends InheritedWidget {
  // 需要向下传递的状态/数据
  final CounterBLoC bloc;

  CounterHolder({this.bloc, Key key, Widget child})
      : super(key: key, child: child);
  // 如果返回值为 true,则通知子树进行重建;返回 false 则不会重建
  @override
  bool updateShouldNotify(CounterHolder oldWidget) {
    return oldWidget.bloc != this.bloc;
  }
  // 这个方法有两点作用:
  // 1、简化获取 CounterHolder 的方式
  // 2、做更加精细的控制,比如异常等
  // 在实践中,更推荐的方式是通过这个方法将数据暴漏出去,在这个例子中就是 CounterBLoC 实例。Flutter 中已有的例子有 Theme,Theme.of(ctx) 的返回值是 ThemeData
  static CounterHolder of(BuildContext ctx) {
    return ctx.inheritFromWidgetOfExactType(CounterHolder);
  }
}
需要注意的地方都在代码中注释了。
第一个页面实现
class _HomePageState extends State<HomePage> {
  @override
  Widget build(BuildContext context) {
    // 向上查询 CounterHolder 然后拿到 bloc 实例,此时 HomePage 就显式依赖了 CounterHolder
    var bloc = CounterHolder.of(context).bloc;
    return Scaffold(
      // ...
      body: new Center(
        child: new Column(
          mainAxisAlignment: MainAxisAlignment.center,
          children: <Widget>[
            Text('You have pushed the button this many times:'),
            new StreamBuilder<int>(
              initialData: bloc.lastCount,
              stream: bloc.count,
              builder: (context, snapshot) => new Text('${snapshot.data}'),
            ),
            new FlatButton(
                onPressed: () {
                  // 跳转到第二个页面
                  Navigator.of(context)
                      .push(new MaterialPageRoute(builder: (ctx) {
                    return new SecondPage();
                  }));
                },
                child: new Text('Go second'))
          ],
        ),
      ),
      floatingActionButton: FloatingActionButton(
        onPressed: bloc.incrementCounter, // 点击次数增加
        child: new Icon(Icons.add),
      ),
    );
  }
}
第二个页面实现
class SecondPageState extends State<SecondPage> {
  @override
  Widget build(BuildContext context) {
    // 向上查询 CounterHolder 然后拿到 bloc 实例,此时 HomePage 就显式依赖了 CounterHolder
    var bloc = CounterHolder.of(context).bloc;
    return new Scaffold(
      // ...
      body: new Center(
        child: new StreamBuilder<int>(
          initialData: bloc.lastCount,  // 拿到最近一次数据
          stream: bloc.count,
          builder: (ctx, snapshot) => new Text('${snapshot.data}'),
        ),
      ),
      floatingActionButton: new FloatingActionButton(
        onPressed: bloc.incrementCounter, // 点击次数增加
        child: new Icon(Icons.add),
      ),
    );
  }
}
使用 CounterHolder 包裹
class MyApp extends StatelessWidget {
  @override
  Widget build(BuildContext context) {
    return CounterHolder(
        bloc: new CounterBLoC(),
        child: new MaterialApp(
          title: 'Flutter Demo',
          theme: ThemeData(
            primarySwatch: Colors.blue,
          ),
          home: HomePage(title: 'Flutter Demo Home Page'),
        ));
  }
}
这里整个将 MaterialApp 包裹住,那么 CounterHolder 可以向应用里任何地方传递数据。
从 InheritedWidget 源码
要理解 InheredWidget 的实现原理得先理解 Flutter Framework 层的中 Widget、Element 和 RenderObject 的联系与区别,如果不知道可以先看看 【Flutter】Widget、Element、RenderObject 理解。 先看看 InhertiedWidget 源码:
abstract class InheritedWidget extends ProxyWidget {
  const InheritedWidget({ Key key, Widget child })
    : super(key: key, child: child);
  // 划重点
  @override
  InheritedElement createElement() => InheritedElement(this);
  @protected
  bool updateShouldNotify(covariant InheritedWidget oldWidget);
}
abstract class ProxyWidget extends Widget {
  const ProxyWidget({ Key key, @required this.child }) : super(key: key);
  final Widget child;
}
@immutable
abstract class Widget extends DiagnosticableTree {
  // ...
}
上面代码唯一有用的就是注释的那个函数,我们知道 Widget 在 Flutter 只是充当着一个配置的角色,最后会 Widget 会转化成 Element,同时 Element 会持 Widget 实例。但是知道这个事实似乎还是没什么用,我们暂且将目光先转向 BuildContext,也就是我们调用 inheritFromWidgetOfExactType 方法的对象。BuildContext 是一个抽象类/接口,但巧的是 Element 实现了这个接口,所以看代码:
@override
InheritedWidget inheritFromWidgetOfExactType(Type targetType, { Object aspect }) {
  assert(_debugCheckStateIsActiveForAncestorLookup());
  final InheritedElement ancestor = _inheritedWidgets == null ? null : _inheritedWidgets[targetType];
  if (ancestor != null) {
    assert(ancestor is InheritedElement);
    return inheritFromElement(ancestor, aspect: aspect);
  }
  _hadUnsatisfiedDependencies = true;
  return null;
}

@override
InheritedWidget inheritFromElement(InheritedElement ancestor, { Object aspect }) {
  assert(ancestor != null);
  _dependencies ??= HashSet<InheritedElement>();
  _dependencies.add(ancestor);
  ancestor.updateDependencies(this, aspect);
  return ancestor.widget;
}
首先看到 _inheritedWidgets 这个成员变量,它的类型是 Map<Type, InheritedElement>,Element 对它的赋值操作在 _updateInheritance 方法里:
void _updateInheritance() {
  assert(_active);
  _inheritedWidgets = _parent?._inheritedWidgets;
}直接拿来主义,InheritedElement 对这个方法进行了重写:
@override
void _updateInheritance() {
  assert(_active);
  final Map<Type, InheritedElement> incomingWidgets = _parent?._inheritedWidgets;
  if (incomingWidgets != null)
    _inheritedWidgets = HashMap<Type, InheritedElement>.from(incomingWidgets);
  else
    _inheritedWidgets = HashMap<Type, InheritedElement>();
  _inheritedWidgets[widget.runtimeType] = this;
}
看到重点了,这里的 _inheritedWidgets 除了从父节点取值外,还把自己放进去了。所以子节点访问父节点并不是往上递归,而是直接保存下来,空间换时间。
还能得到一个结论:BuildContext#inheritFromWidgetOfExactType 只能访问最近的一个目标节点,因为 _inheritedWidgets 是一个字典。
子节点访问父节点的原理就清楚了,还有一个问题就是如何做到通知子节点重建?
注意最开始 Element#inheritFromElement 方法的这行代码: ancestor.updateDependencies(this, aspect),这个时候已经知道了 ancestor 的类型是 InheritedElement ,那么看代码:
@protected
void updateDependencies(Element dependent, Object aspect) {
  setDependencies(dependent, null);
}
@protected
void setDependencies(Element dependent, Object value) {
  _dependents[dependent] = value;
}
InheritedElement 把依赖它的节点给保存下来了,即简单的监听者模式,所以在后续状态/数据更新的时候就遍历 _dependents 进行通知。
关于 Redux
因为 Flutter 从 React 中借鉴了非常多,所以 React 中 redux 在 Flutter 中也有相应的实现,不过使用上会比 BLoC 繁琐一些,相比之下也不够直观。所以在非必要的情况下,首选 BLoC 吧。