从 Android 4.4 开始,HttpURLConnection 底层使用 OkHttp 实现,所以阅读并学习它的源码就显得更加地理所应当。

为了简洁起见,我们去除源码中一些健壮性代码。

本文基于 OkHttp 3.8.1

分析案例

这里我们选用最简单的 GET 请求来分析 OKHttp 的内部工作大体流程。

一般情况下的同步 GET 请求我们是以下面的方式发起的:

1
2
3
4
5
6
7
8
9
Request request = new Request.Builder()
.url(url)
.build();
OkHttpClient client = new OkHttpClient.Builder()
.build();
Call call = client.newCall(request);
Response response = call.execute();
String content = response.body().string();
response.close();

**异步 GET **请求又是下面这样子的:

1
2
3
4
5
6
7
8
9
10
11
12
call.enqueue(new Callback() {
@Override
public void onFailure(Call call, IOException e) {

}

@Override
public void onResponse(Call call, Response response) throws IOException {
String json = response.body().string();
response.close();
}
});

调用 call.execute() 将会执行同步请求,执行 call.enqueue() 则会发起异步请求。

下面看看网络请求真正开始前做的动作。

整体流程

真正开始之前,我们还是先看看一个请求执行的整体流程吧。
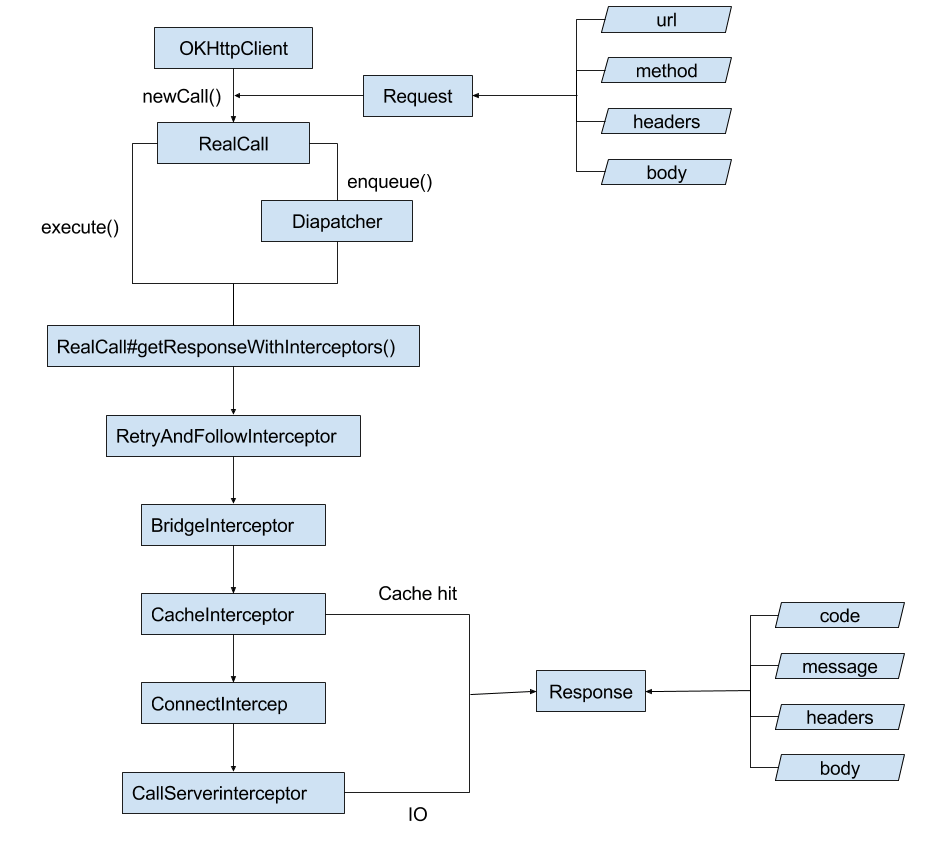
请求准备

首先会构建 Request ,不管是 GET 还是 POST,然后调用 OKHttpClient#newCall(request) 得到一个表示请求的 Call 对象。

然后调用 call.execute() 或者 call.enqueue() 触发同步或异步请求。

先看一下 okHttpClient.newCall(request) 做了什么工作:

1
2
3
public Call newCall(Request request) {
return RealCall.newRealCall(this, request, false /* for web socket */);
}

继续跟着看 RealCall#newRealCall()

1
2
3
4
5
6
static RealCall newRealCall(OkHttpClient client, Request originalRequest, boolean forWebSocket) {
// Safely publish the Call instance to the EventListener.
RealCall call = new RealCall(client, originalRequest, forWebSocket);
call.eventListener = client.eventListenerFactory().create(call);
return call;
}

Call 只是一个接口,内部实际上给我们返回了 Call 的实现类 RealCall 的一个实例。

到了区分同步异步的地方了,为了方便分析,我们先看代码:

RealCall#execute()

1
2
3
4
5
6
public Response execute() throws IOException {
client.dispatcher().executed(this);
Response result = getResponseWithInterceptorChain();
if (result == null) throw new IOException("Canceled");
return result;
}

RealCall#enqueue()

1
2
3
4
5
6
7
8
9
10
11
12
13
14
15
16
17
18
19
20
21
22
public void enqueue(Callback responseCallback) {
client.dispatcher().enqueue(new AsyncCall(responseCallback));
}
//内部类
final class AsyncCall extends NamedRunnable {
private final Callback responseCallback;

@Override protected void execute() {//线程启动后将会调用这个方法
try {
Response response = getResponseWithInterceptorChain();
if (retryAndFollowUpInterceptor.isCanceled()) {//请求取消了
responseCallback.onFailure(RealCall.this, new IOException("Canceled"));
} else {
responseCallback.onResponse(RealCall.this, response);
}
} catch (IOException e) {
responseCallback.onFailure(RealCall.this, e);
} finally {
client.dispatcher().finished(this);
}
}
}

同步方式中,先将请求添加到 DIspacher 同步请求队列里,然后发起网络请求;而异步方式中,先将 RealCall 包装成一个 AsyncCall 然后添加到 Dispatcher 的异步请求队列里,这里 AsyncCallRunnable 的一个子类,run 方法的内部实现会调用 AsyncCall#execute(),从而发起网络请求。

两种请求方式最终都是通过调用 RealCall#getResponseWithInterceptor() 来发起真正请求的,两种方式的区别只是在任务的管理方式不一样。

发起真正的请求

上面我们分析知道,不管是同步还是异步请求,最终都是调用 RealCall#getResponseWithInterceptors() 来发起请求并获得响应。那么我们先看看这个方式内部做了一些什么样的工作:

1
2
3
4
5
6
7
8
9
10
11
12
13
14
15
16
17
Response getResponseWithInterceptorChain() throws IOException {
// Build a full stack of interceptors.
List<Interceptor> interceptors = new ArrayList<>();
interceptors.addAll(client.interceptors());
interceptors.add(retryAndFollowUpInterceptor);
interceptors.add(new BridgeInterceptor(client.cookieJar()));
interceptors.add(new CacheInterceptor(client.internalCache()));
interceptors.add(new ConnectInterceptor(client));
if (!forWebSocket) {
interceptors.addAll(client.networkInterceptors());
}
interceptors.add(new CallServerInterceptor(forWebSocket));

Interceptor.Chain chain = new RealInterceptorChain(
interceptors, null, null, null, 0, originalRequest, this, eventListener);
return chain.proceed(originalRequest);
}

正如这个方法的名称一样,这里构建了一个拦截器列表,然后通过 RealInterceptorChain#proceed() 方法的启动拦截器链。首先会将所有我们在构建 OKHttpClient 时添加的一系列 应用拦截器 ,然后添加一些内置的拦截,最后添加的是 网络拦截器

应用拦截器和网络拦截器的区别我们另一篇文章见

关于拦截器,我们这里暂时不做具体讨论,不过为了方便分析,还是看看拦截器的接口定义:

1
2
3
4
5
6
7
8
9
10
11
12
13
14
15
public interface Interceptor {
Response intercept(Chain chain) throws IOException;

interface Chain {
Request request();

Response proceed(Request request) throws IOException;

/**
* Returns the connection the request will be executed on. This is only available in the chains
* of network interceptors; for application interceptors this is always null.
*/
@Nullable Connection connection();
}
}

Interceptor 定义还是非常简单,核心函数定义就只有一个——intercept ,这个方法负责的就是处理传入的 Request ,然后传递给下一个拦截器,直到最后一个拦截器的时候,它就会将请求发送给服务器,然后获得相应并且返回。请求是如何在拦截器之间传递的呢?我们看到 Interceptor 内部还有一个 Chain 接口,这个就是一个抽象的拦截器链,在上面的代码中,它的实现类 RealIntercetorChain 调用 proceed 函数来开始拦截器的处理。我们看看这个 RealInterceptor#proceed() 方法的具体实现:

1
2
3
4
5
6
7
8
9
public Response proceed(Request request, StreamAllocation streamAllocation, HttpCodec httpCodec,
RealConnection connection) throws IOException {
// Call the next interceptor in the chain.
RealInterceptorChain next = new RealInterceptorChain(interceptors, streamAllocation, httpCodec,
connection, index + 1, request, call, eventListener);//构建下一级的拦截器链
Interceptor interceptor = interceptors.get(index);//获取下一个拦截器
Response response = interceptor.intercept(next);//调用拦截器的拦截方法
return response;
}

这个方法的作用已经用注释注明,然后我们看一眼拦截器的 intercept 内部的流程:

1
2
3
4
5
6
7
@Override
public Response intercept(Chain chain) throws IOException {
//其他处理
response = chain.proceed(networkRequest);
//其他处理
return response;
}

这里没有列举具体的拦截器的代码,不过自定义过拦截器的同学应该都很熟悉上面的流程,除去对请求和响应的处理工作,核心语句就是调用 Chain#intercept ,反反复复,拦截器和拦截器链之间的相互调用,会将 Request 传递到最顶层的拦截器,最终向服务器发起请求报文并获得响应。

这里还是简单的讲一下每个拦截器的作用:

  • RetryAndFollowUpInterceptor

处理失败重试和重定向问题,同时还负责控制请求的取消等操作

  • BridgeInterceptor

处理请求头,添加一些必要的头信息或者转换头信息

  • CacheInterceptor

缓存相关,如果缓存可用,就没必要从服务器获取响应,直接返回缓存的响应;如果缓存过期或不可用,则向服务器发起请求,获取响应之后缓存并返回

  • ConnectInterceptor

见名知意,他负责建立与服务器的连接,期间会进行三次握手,建立 TCP 连接;如果目前已经有了一条空闲的连接,则会直接使用这条连接,避免重新进行三次握手等建立连接

  • CallServerInterceptor

这是最顶级的拦截器,它前面的拦截器建立好了连接,那么这个拦截器就是负责向服务器发起具体的请求并获取响应

现在还只是粗略的分析了请求的整体流程,关于其他具体的部分如 连接池、拦截器等,我们单独列出文章讲解。